


 24/7 Emergency Service
How to Avoid Water Damage During Frozen Pipe Season
12/14/2022 (Permalink)
 A frozen pipe often means a burst pipe, and that means lots of water damage to your home or business. Prevent it by following our tips.
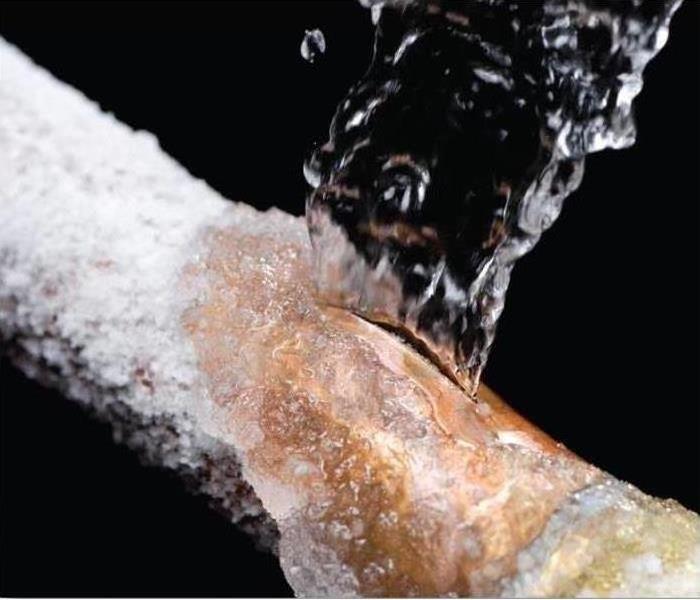
Wintertime, and the pipes are freezing! That’s not music to any homeowner’s ears: a frozen and burst pipe can do astounding amounts of damage—and quickly—to a home, apartment, or business. This article gives you ways to avoid that kind of water disaster—and ways to recover fast if you do end up with a frozen and burst pipe.
The most common cause of a burst pipe is freezing. (Other causes of a ruptured pipe include rust, improper installation and physical damage to the pipe.) When water freezes, it expands in volume by about 9 percent, and the pressure inside pipes may shoot from 40 psi to 40,000 psi, causing the pipe to break open. The rupture usually occurs where water pressure finds a weak spot in the pipe, which may or may not be at the spot where it froze. And then the trouble starts: water seeps or even gushes out into your home or office. Sometimes this happens out in the open, but often it occurs behind walls or ceilings, or in an attic or basement.
Lots of damage can occur without you even knowing it. In fact, up to 250 gallons of water can flow from your ruptured pipe in just 24 hours. The second-most common insurance claim filed in the U.S., an average residential water damage claim is $10,000–15,000, and total cleanup costs can be $5,000–70,000.
The best way to avoid that kind of disaster is to keep your pipes from freezing. Logically, that means keeping your pipes too warm to freeze. Luckily, there’s a lot you can do before, during and after the temperature drops to prevent a frozen pipe in your home.
Before a Freeze
Start getting your pipes ready to handle the cold before the temperature drops. Start with an inventory of your pipes. Look for:
- Exposed pipes in unheated areas of your house. Check your basement, attic, garage, crawl space and under bathroom and kitchen sinks.
- Pipes that show wear or damage.
- Un-insulated areas of the house.
Once you’ve identified vulnerable pipes or chilly areas, get to work:
Protect your pipes
- Wearing protective gear, install un-faced fiberglass insulation around poorly-protected pipes in the attic, crawl space or other out-of-the-way place. Don’t worry about being neat, just get those pipes wrapped.
- Install a heat trace cable to keep cold pipes from freezing. Some heat tapes are wrapped around the pipe, while others run along the length of the pipe. Look for ready-to-use cable, with one end terminated and insulated and the other end equipped with an electrical plug.
Keep the cold out
- To insulate a big area, use foam board. Faced or un-faced foam board will work, especially if this is temporary. Install it by scoring, snapping and screwing the foam board to your wood framing.
- Using rigid foam insulation, close and seal all foundation vents that are near water pipes, and insulate foundation walls and the ends of the floor joists.
- Caulk and seal around doors, windows, house faucets and outside outlets.
- If you own an older house built over an un-insulated crawlspace, turn up your thermostat to warm up the crawlspace. (And put “insulate and air-seal crawlspace” on your to-do list!)
- Turn off the water valves to outdoor faucets, keeping the outside valve open to let any remaining water escape
If you will be away from home
If you will be away from your home at all during a cold snap, take a few steps that could mean the difference between returning to a warm, dry house and returning to a water disaster.
- Set your thermostat to 55° F to conserve energy while providing a margin of safety against frozen plumbing.
- Close the valve to the house's main water supply.
- Give a trusted neighbor a key to the house and your contact information. Request that he take a quick look inside once a week.
- If your house is heated with propane or fuel oil, be sure that your fuel supplier has contact information for you and your neighbor.
- Install or subscribe to a freeze-sensing system to monitor your home's internal temperature using a phone or the internet.
During a Freeze
Now that you know which pipes are at risk, take some or all of these steps when the temperature plunges.
- Open the doors to cabinets, vanities, closets and pantries to allow room air to warm the pipes.
- Turn faucets on to allow a trickle of water to flow through the pipes.
- Set up fans to blow heat into cold rooms or your crawl space.
- Keep the garage door closed if there are water supply lines there.
- Place a lamp with a 60-watt bulb in a potential problem area to warm the walls and pipes. (Make sure there are no combustible materials near the bulb.)
- Heat the most vulnerable pipes (usually in basements and crawl spaces or near exterior walls) with a hair dryer. Leave the faucet on while you apply heat.
- If your water pipes are freezing inside an exterior wall, cut an opening in the wall to expose the pipes to the home's warm air. Place fiberglass insulation around the pipes and against the exterior wall. (The hole in the wall can be covered later with a hinged door or panel that can be removed during future cold spells.)
After a Freeze
When the freeze is over, your work is still not done. Now is the time to do another survey of your vulnerable pipes to see if there has been any damage.
- Visually inspect any exposed plumbing in your attic, basement, garage or crawl space.
- Even if your pipes didn't noticeably freeze, or if they thawed out without bursting, they may have developed pinhole leaks. Run your fingers over the seams and joints to check for hard-to-spot leaks.
- Do the same inspection of your pipes under sinks, too.
Throughout the rest of your home and property, pay attention to other clues that may indicate a leak:
- Dripping, bubbling, whistling or sounds of water rushing in pipes or behind walls.
- Odd or unpleasant odors from drains, sinks or other areas of your house.
- Bulging and discoloration or water marks on walls and ceiling.
- Discolored water coming from your faucets.
- A decrease in water pressure when you wash your hands, fill your sink or take a shower.
- No water at all coming out of a faucet or a toilet that doesn’t refill after flushing.
- Drips, puddles or gushing water.
- Unexplained water or sinkholes in your yard.
If you find a problem or notice a drop in water pressure, turn off the water and call a plumber for help.
If You Found a Frozen Pipe
You’ve done your detective work, and you discovered a frozen pipe. Because it’s still frozen, there’s no water leaking … yet. Fortunately, you can still take measures to prevent or minimize water damage.
- Shut off the water at the main valve or the meter in case the pipe does burst. Then, open up all the taps in your house to relieve any pressure building up inside the lines.
- Thaw the ice blockage by warming the connecting pipe. Using a hair dryer, start at the faucet or fixture and work your way back.
When the pipe is thawed, you’ll need to find out if it has burst somewhere along its length.
- Turn the water on and recruit a friend or two to help spot any leaks. Station your friend in an unheated area of your home, like your attic or crawlspace, to look and listen for leaks as you turn the water back on.
- If a pipe has burst, you'll immediately notice a rushing sound in the walls or a flood of water. Shut off the water to your house immediately.
- If you identify no apparent leaks, check each of your faucets in turn. If you notice low water pressure at a particular fixture, you may have a slow leak in that line.
If You Found a Leak
You’ve located water leaking from a pipe, so now’s the time to act fast.
- First, shut off the main water valve to your home. Open a faucet after you shut off the water main to relieve any remaining pressure in the pipes.
- Depending on where the leak is and how substantial it is, shut off the electricity to your home, too, to prevent shocks.
- Clean up any standing water to prevent slipping and falling, reduce the chances of water damage to your home and furnishings, and minimize the odds of mold growth.
- If the burst pipe is overhead, drain ceiling cavities by punching or drilling “weep” holes.
Immediately after a freeze, getting a plumber to your home can be challenging, so you’ll want to slow or stop that leak as soon as you can. (Or call an experienced water disaster recovery company, like SERVPRO of West Hartford, that has the resources and expertise to get to your home fast, stop the leak and begin cleanup.)
- For a pinhole leak, wrap duct tape around the pipe; this will often provide enough pressure to seal the leak until help arrives.
- If duct tape doesn’t stop the leak, make a patch out of a piece of flexible rubber (such as an old radiator or heater hose), place it over the leak, lay a small block of wood over the patch and clamp it in place using a C-clamp.
- An even better option, especially for larger leaks, is a sleeve clamp, which consists of a circular clamp lined with rubbery material that makes a waterproof sleeve for the pipe. (Note: you’ll have to buy a clamp sized to your specific pipe.)
Dry Your House Out
Once you or your plumber has stopped the flow of water and you’ve done basic cleanup, you need to dry out your home. An experienced water disaster remediation company like SERVPRO of West Hartford can do all the work and restore your home and property to their before-disaster condition.
Your goal is to prevent mold growth. Although it takes a few days to appear, mold thrives on wood, paper and particle board, so it’s essential to dry everything out before you rebuild. IICRC-certified professionals, like SERVPRO, use a variety of precise instruments to measure when a building is dry.
If you choose to do the work yourself, follow these tips.
- Remove pools and puddles of water with a wet/dry vacuum. For hard-to-reach places, use a mop to soak up the water.
- Open windows and use several fans to circulate the air and send moisture out the windows.
- If you have dehumidifiers, turn on one or several and close the windows.
- Or if you have a HVAC system, use that to dehumidify your home. Start by setting the air conditioning to cool your house and pull out humidity. Then, when your home has cooled, turn the heat on until it reaches 80 degrees, which will saturate the air with moisture. Once 80 degrees has been reached, turn the air conditioner back on to remove the moisture from the house. Repeat this process until the house has dried.
- Remove water from wet furniture by taking it outside to dry in the sun or placing it in a closed room and running a dehumidifier.
- If your indoor carpeting is saturated (unless it’s a thin covering over a bare wood floor), you must remove and replace it, as well as its padding, to keep mold and mildew from forming.
If your home or business suffers a flood, call SERVPRO of West Hartford today at 860.206.6141 for immediate water damage cleanup and restoration of your structure and property
We’re Here for You
The team at SERVPRO of West Hartford has specialized training and experience in water damage remediation, fire restoration services, natural disaster prevention, chemical cleanup, and natural disaster cleanup. Call SERVPRO of West Hartford (860.206.6141) any time.
SERVPRO of West Hartford
100 Peters Road, Bloomfield, CT 06002
IICRC Certified
Noemi Garcia
Certified SERVPRO technicians
Call 860.206.6141
24-hour emergency service
If your home or business suffers a flood, call SERVPRO of West Hartford today at 860.206.6141 for immediate water damage cleanup and restoration of your structure and property